Monday, October 26, 2009

CQ World Wide - The Big One

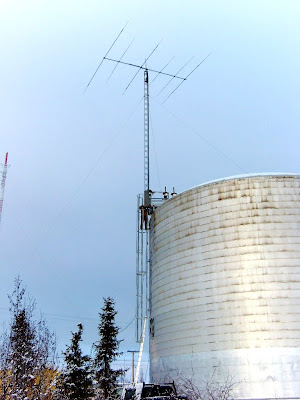
We had so much fun in CQ WW last year that I've been eagerly anticipating this one for a whole year! With the new antennas permanently installed at the contest site there was no more field-day-style operations. Just tow the shack trailer up to the site, plug in the big TH6DXX yagi and the low band vertical, pop up the little TH3JRS on the trailer mast and away we go!

I was fully expecting this year's event to be a dismal failure. The geomagnetic field was predicted to be active all weekend. At this latitude, active geomagnetic conditions and low solar flux means no contacts on HF. Fortunately, Gabriel (the patron saint of ham radio) was still keeping an eye on us after our antenna raising last weekend and arranged for a flurry of sun spots to make up for the aurora.

Our only goals this year were to break the VE8 M/2 record we set last year and to make over a thousand contacts. Even with eight hours of auroral induced 'off-time' early Sunday morning conditions were otherwise very good and by Sunday afternoon both items were in the bag.

Lots of highlights over the weekend, here's the Top Ten List:

1. Starting the contest with a 100-hour on 20m. Now that's hitting the air running!

2. The excellent conditions on 40m Friday night. I worked all continents in the same hour just after midnight local time.

3. The surprise opening on 15m to Europe at 4am local time Saturday morning.

4. Working SU1KM in Zone 34 on Saturday morning for my LAST zone for the CQ WAZ award.

5. Working not one but TWO other VE8 stations (VE8DAV and VE8NSD) and VY0HL. Zero points for the contest but still cool and unusual!

6. Pushing the rate meter past 200 running stateside and JA stations late Saturday afternoon.

7. Having Wally ask me to work a Brazilian station on 15m that he'd been calling for 10 minutes with no success. He meant for me to use the big yagi and my amplifier but instead I just picked up his headset and made the contact with my first call. I told him the secret was "timing, tone and annunciation" ;)

8. Working several all-time new ones for DXCC. I've got to comb through the logs to find out which ones but I know for sure Tonga and Fiji and I'm pretty sure there's one or two more.

9. Working DP1POL in Antarctica on Sunday afternoon. I came across him CQing by himself and didn't even realize where he was until I put his call in the computer. We both said "Wow!"

10. Hunting multipliers off the cluster on Sunday afternoon I dialled up the QRG of some Caribbean station and the very first thing I heard was "who's the station with Victor?" I quickly threw out my callsign and into the log he went!


VE8DW shows off the broken record after finishing up on Sunday.

That's all until the next one. Thanks for all the Q's and we'll see you in Sweepstakes!

73 de VE8EV

CQWW SSB VE8EV M/2 HP

CQ Worldwide DX Contest, SSB

Call: VE8EV
Operator(s): VE8EV VE8DW
Station: VE8EV
Class: M/2 HP
QTH: Inuvik, NT
Operating Time (hrs): 40
Summary:

Band QSOs Zones Countries
------------------------------
160: 1 1 1
80: 5 4 4
40: 73 17 34
20: 850 33 106
15: 130 16 22
10: 0 0 0
------------------------------
Total: 1059 71 167 Total Score = 624,036

Comments:
With active geomagnetic conditions predicted for the whole weekend I thought this was going to be a total washout but the unexpected sunspots compensated nicely for the electric overcast. The bands were great for the first 30 hours followed by 8 hours of zero-rate diode propagation when the K-index spiked overnight Saturday. More-or-less normal conditions after that for the rest of the contest.

Our goals were to get over 1000 Q's and break the VE8 record, both of which we accomplished. Full write-up http://ve8ev.blogspot.com/

73 and see you all in Sweepstakes!
John VE8EV Wally VE8DW

Friday, October 23, 2009

Thanks, Gabe!

We finally finished putting up the big yagi last Sunday. In typical fashion, the one weekend job ended up taking two full weekends to complete but we were taking our time and doing things right.

As I mentioned in my previous post, the tower is on the local water supply storage tank at the same location we do our contest operations from. The tank is 60 feet high and the tower is another 40 feet on top of that so a perfect perch for the big TH6DXX.

While I did most of the aerial gymnastics, VE8DW worked the ground end and snapped some great pictures.


Day 1. The old tower had not been used for many years.


Day 2. Tower is down and now mounting a gin pole to stabilize the old 18 foot long fiberglass VHF antenna as it comes off.


Day 3. Top section with rotator back on and assembling the yagi. I put the boom on first then rotated the mast to install the elements.


Day 4. Up she goes! The winds had been gusting all morning but right before we were ready to start the lift the wind stopped and the sun came out. Once we were done I Googled 'patron saint of ham radio' and found out it was Gabriel we needed to thank for the warm sunshine and the respite from the wind at the critical moment.

We'll find out how well it works this weekend during the CQ World Wide SSB Contest!

73 de VE8EV

Tuesday, October 13, 2009

Better Safe Than Sorry!

I should have known better. I service high voltage equipment all the time at work and the safety precautions are thoughtfully and carefully layered so no one gets hurt. High voltage insulating gloves, voltage sensing wands, locking/grounding disconnects, rubber floor mats, etc. Exacting procedures tie together all the safety apparatus. You do things EXACTLY correctly because you don't want your children to grow up without a father. So why should things be any different with amateur equipment?

My amp has issues. Nothing major, but it's old and sat in an oceanside warehouse for many, many years before I rescued it. Just little things. Like all of a sudden it wouldn't bandswitch properly on any band except 20 meters. Now that I was putting up an all-band vertical antenna I was pretty sure I was going to want to use the amp on other bands. So, while I was putting up antennas and dabbling in the California QSO Party, I decided to take a look at the bandswitch. Oh yeah, and while I'm at it I need to have a look at the meter. The HV metering also seems to have quit...

This is not a decision to be taken lightly. First of all, the amp is mounted in the equipment rack. I can just squeeze in along the side of the rack and reach behind to unplug the amp and disconnect the coax and control cables. The next trick is getting it out of the rack. This ain't no 30 pound Tokyo Hy-Power solid-state wonder. This is a piece of heavy-duty, mid seventies commercial equipment and it weighs 350 pounds! Fortunately, the procedure is fairly well developed. Slide it out of the rack onto a piece of carpet and from there, with a bit of grunting, you can slide it to where you want it. Now that its all disconnected and clear of the rack you can open it up. Two dozen screws to get the top cover (with electrical interlock) off then several more screws and pieces to come off to be able to slide the bandswitch control out a bit to take a look at it.

So I'm happily disconnecting wires and removing screws in the RF compartment when *WHAM* something bites me AND HARD! I'm sitting there rubbing my hand and starting at the amp with the same sort of disbelief as when the loving family pet up and bites you. What the heck? It's not plugged in. The cord won't even reach the outlet unless it's all the way into the rack. The capacitors couldn't STILL be charged. The HV hasn't been on for hours! But obviously, that's exactly what was going on. Fortunately, I only had one hand in the works or I might not be telling this tale.

I pulled out the schematics and started looking at the power supply diagram. Oh, the HV metering is in series with the bleeder resistors. Starting to make sense now. No bleeders, no HV meter, no discharging the capacitors. Oh, and the interlock on the cover only short circuits the primary (low voltage) side of the HV transformer. I sacrificed a few high value 1/4 watt resistors to discharge the capacitor. This thing has an 8 uF oil-filled capacitor which would easily discharge enough current to blow the end off a screwdriver if you shorted it directly to ground when it was fully charged. After I had blown up a few small resistors then I felt I could safely zap it to ground with a screwdriver. Just as a final precaution, I checked it with a meter. The voltage was rising again! There must be another capacitor in the circuit that was back feeding this one and slowly charging it again. It was rising at almost 50 volts per minute. I discharged it again and quickly clipped a ground wire onto the capacitor to hold the voltage down and bleed off the other cap. Once I was sure everything was finally dead I proceded to change out the open bleeder resistor and all was well. The metering worked properly and when you shut the switch off the HV would go from 4000 to zero in 10 seconds.

So, the moral of the story? DO IT RIGHT AND BE SAFE.

EVERY time you open up an amplifier or other piece of HV electronic equipment ALWAYS ASSUME that the high voltage lines are still ENERGIZED until they are SAFELY and SECURELY grounded.

Oh, and the bandswitching problem? I had band program card plugged in upside down!

Ex Luna Scientia

Well, I didn't quite make my deadline of getting it done before summer was over but now it's a done deal. This weekend, in between all the HF antenna work, I did find the time to point the VHF/UHF antenna array at the moon and make a contact. The ARRL EME Contest was running and from this far north the moon was above the horizon for the entire 48 hour period.

Like many things, I have procrastinated for months now on building a computerized antenna positioning unit. The pointing is plenty accurate for satellite work but leaves much to be desired for EME. Fortunately, it cleared up Saturday night and I could adjust the antennas by sighting the moon along the antenna booms. The ferocious winds made it difficult to keep the antennas aimed and the moon actually clips across the sky faster than you might think!

I spent quite a bit of time tuning between 144.000 and 144.100 listening for CW but didn't hear a peep. After a while I fired up the WSJT software and started looking for JT65 signals. It didn't take me long to find KB8RQ. Gary's station in Ohio has two dozen 13 element yagis with 1.5kW on VHF and Saturday night he was RUNNING stations off the moon! Of course not quite the same rate as an HF contest (it takes five minutes to complete a JT65 QSO) but he had a steady stream of callers with few unanswered CQ's. Once I had everything dialed in I could easily hear his tones in the headphones and he was registering -17dB in the software. I had only tried calling a few times when he came back to my pair of 13 element yagis and 100 watts.

I spent another hour or so after that tuning around but never heard anyone else calling CQ. I copied a few stations calling other (unheard) stations and lots of distinctive '73' tone pairs but didn't make another QSO. Hopefully this is the motivation I need to get the 2m linear amplifier built and finish the computer antenna controller!

MFJ-1025 Noise Cancelling Signal Enhancer

If you're anything like me you're sometimes troubled by noise. At my home QTH I only get two kinds of noise: man-made and natural. S9 noise on all the low bands and sometimes troubling on the upper bands too. I finally decided to try one of the MFJ-1025 "Noise Cancelling Signal Enhancer" box. All the online reviews seemed to generally agree that this was one piece of MFJ gear that did what it was supposed to.

The theory behind it is actually quite simple. Take the signals from two different antennas and adjust the phasing to null or enhance signals from different directions. One thing that needs to be emphasized is that the more closely matched the antennas are the better it will work. I used a 23 foot vertical as the main antenna and an 18 foot vertical whip about 30 feet away as the noise sensing antenna.

Does it work? Well, it doesn't work miracles but it does sometimes work wonders. As long as the noise that is troubling you is from a single direction it WILL be able to reduce it. How much depends on many factors, mostly how well you are receiving the noise on each antenna. One thing I did do right away was to replace the little light bulb used as an RF 'fuse' on the noise antenna input with a relay to ground the input when I transmit. The light bulb would probably be okay if I was only running 100W but a kilowatt into the main vertical popped the little bulb in short order.

It definately takes a bit of practice to get used to operating it but the procedure is pretty straight forward. Adjust the gain controls for each antenna so the noise is at the same level on each antenna and the carefully adjust the phase control for a dip in the noise level. A little tweaking of one level control, adjust the phase control for minimum noise level and you're done. It really helps if you set your radio AGC control to 'fast' during the adjustments.

This little gizmo is aleady on my indispensible list. For more info, Tom W8JI has a nice description of the theory on his web page at http://www.w8ji.com/mfj-1025_1026.htm

Winter Wonderland

The snow is on the ground and the temperatures are below freezing. That traditionally means it’s time to start doing antenna work. I don’t really know why we (actually me) can’t get our (my) act together and do it during the summer. There’s always so much going on when the weather is nice and a never ending litany of excuses. It’s too hot, it’s too cold, it’s raining, there’s too many bugs, there’s better things to do, etc, etc. Once October hits, though, the situation seems to reverse itself. Yeah, it’s 5 below zero outside -BUT- it’s only gonna get COLDER. And DARKER. And WINDIER. And CQ World Wide is only a few weeks away now… Better suck it up and get onto the antenna work before it’s REALLY miserable out there.

So I spent last weekend up on my roof putting up a 23 foot vertical antenna for the low bands and an 18 foot vertical antenna for the noise sensing antenna to use with my MFJ-1025. Before I got started, I modelled several different rooftop antenna and radial configurations in EZNEC. It’s quite amazing what little things make a big difference and what things make very little difference. The end result of the modelling was to put the vertical on a tripod mount at one end of the roof with two 18 foot radial wires down to the eaves and one 33 foot radial wire along the ridge of the roof. This gave a reasonable performance and efficiency on all bands. I modelled it with a few more and different length radials but it didn’t seem to make much difference. I fed the antenna with a chunk of LDF2-50 hardline I had handy and it loads up quite easily with the internal tuner on 40-10 meters. I can load it for 80 and 160 meters with the external tuner but I really don’t expect too much on those bands. Judging by the contacts I’ve made so far the modelling seems to be valid. I haven’t had a chance to play with it too much yet but I have made a few contacts on several different bands and on 17 meters I even got a 10-over-S9 report from a JA station and worked the TX5SPA expedition in the Austral Islands.

The weekend after the vertical went up it was time to start on the big project. Originally scheduled for late June, Wally and I had planned to permanently mount the TH6DXX yagi up at the contest site. The setting for that is a 40-foot guyed tower on top of a 60-foot high water tank. We had hung temporary wires from the water tank last winter during contests but hadn’t exactly figured out how we were going to get the big yagi up to the top of the tower. I’ve done enough tower work to know there was no way I was going to climb it. I don’t like climbing towers to begin with and old, rickety, light duty guyed towers are a non-starter with me. However, one day last spring when we were taking down the wire beam after the ARRL DX contest, I noticed that there was a hinge on the bottom edge of the steel pocket that the base of the tower sat in. Looking more closely, I realized that if the bolts were removed from the bottom plate it would swing open and allow the tower to drop through along the side of the water tank.

So this weekend we went up and bolted a small winch to the edge of the base frame and eventually got the tower lowered down, the old un-used VHF antennas off, and the top section removed. We might have actually pressed ahead and installed the yagi but even though it was only a couple of degrees below zero the wind was howling all weekend. Once all the demolition was completed we decided to call it a wrap for the weekend and enjoy the Canadian Thanksgiving holiday.

Today I got the rotator mounted in the top section and we should be all ready to put the yagi up on Saturday. Wally, VE8DW, has been taking pictures so I'll post the results of our efforts next weekend when we're done.